What makes no-churn ice cream so appealing?
No-churn ice cream is a delightful dessert that offers a simple and convenient alternative to traditional churned ice cream. Unlike traditional recipes that require an ice cream maker, no-churn ice cream can be made with just a few basic ingredients and a hand mixer or whisk. This method eliminates the need for special equipment or lengthy preparation, making it accessible to everyone. The key advantage of no-churn ice cream is its ease and versatility. It allows you to experiment with a wide range of flavors and mix-ins while still achieving a creamy and smooth texture. Additionally, it offers the freedom to control the ingredients, including the amount of sugar used, making it a great choice for those looking for healthier or dietary-specific options. With no-churn ice cream, you can whip up a delicious frozen treat in no time and enjoy its wonderful flavors with minimal effort.
Why is blueberry tea perfect for making a low-sugar ice cream at home?
Blueberry tea is an excellent choice for making a low-sugar homemade blueberry ice cream at home due to its natural sweetness and numerous health benefits. The tea offers a delightful flavor profile, rich in fruity and slightly tangy notes, which infuses beautifully into the ice cream base. Since blueberry tea is naturally sweet, it reduces the need for additional sugar in the recipe, making it a healthier option.
What are blueberry tea benefits?
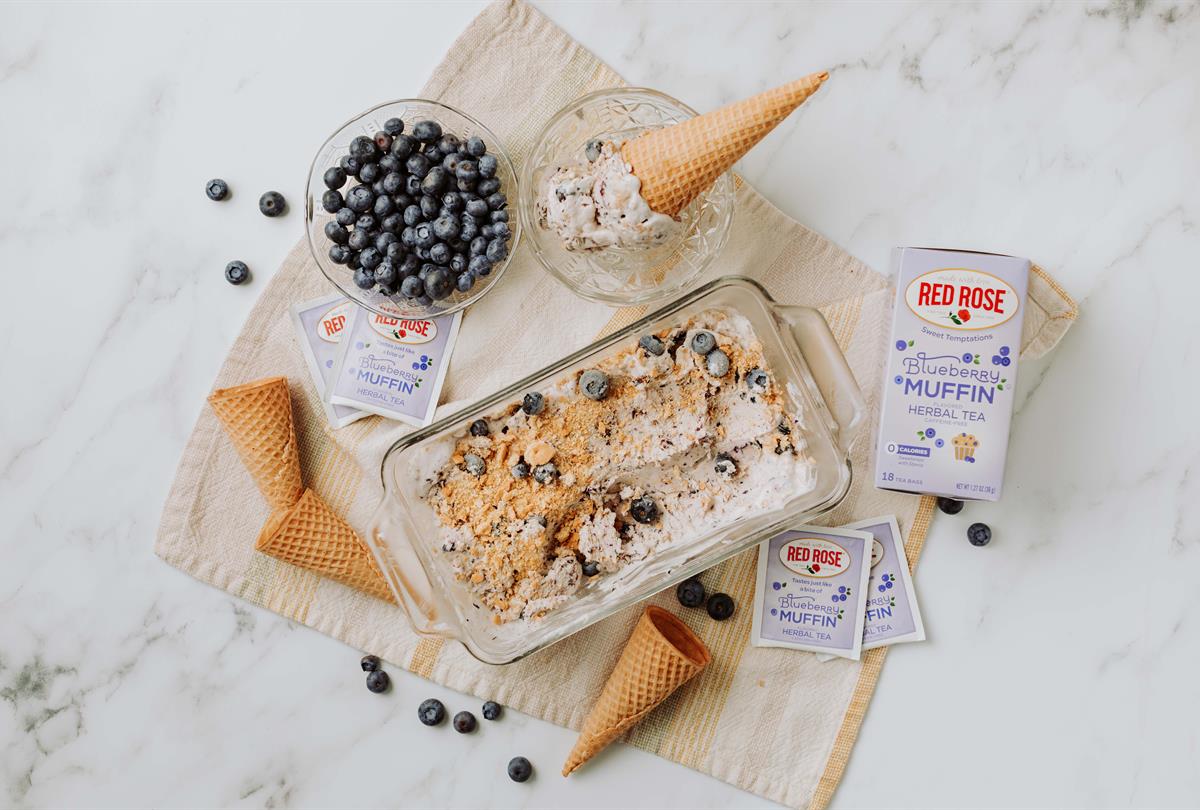
Red Rose's Blueberry Muffin tea has that farm fresh blueberry taste we know and love blended with a yummy hint of crumb cake. Not only is this tea sugar free, it is also a caffeine-free herbal tea that is lightly sweetened with Stevia.
By incorporating blueberry tea into your low-sugar ice cream, you not only enhance the taste but also benefit from the nutritional value of blueberries. It's a fantastic way to enjoy the deliciousness of blueberries while keeping your dessert lower in added sugar and embracing the goodness of natural ingredients.
Why should you try this irresistible no-churn blueberry tea ice cream recipe?
This no-churn blueberry ice cream recipe offers a delightful and simple way to create a healthier frozen treat. The recipe's simplicity lies in its lack of need for an ice cream maker and minimal ingredients. By using blueberry tea, the ice cream gains a natural and refreshing flavor without the need for artificial additives. The minimal amount of sugar required in the recipe ensures a healthier option without compromising on taste. Additionally, the blueberry tea provides antioxidants and other health benefits, making it a nutritious choice. With this recipe, you can enjoy a creamy, flavorful, and guilt-free blueberry ice cream that is easy to prepare and perfect for satisfying your sweet cravings.
Ingredients for homemade ice cream
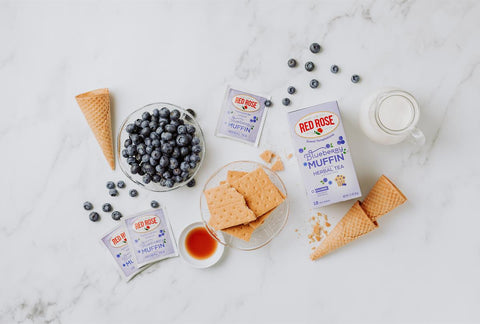
1-2 Tea Bags Red Rose Sweet Temptations Blueberry Muffin
½ Cup + extra Blueberries (fresh or frozen blueberries)
1 Cup Heavy Cream
½ Can (7 oz) Sweetened Condensed Milk, Chilled
¼ tsp Vanilla Extract
1-2 Graham Crackers
Blueberry Ice Cream Recipe

- Place your electric beater attachments in the freezer overnight, as this will help keep the mixture as cold as possible.
- Brew 1-2 tea bags of Blueberry Muffin Sweet Temptations in ¼ cup boiling water for 5 minutes. Try to use as little water as possible, as any extra will make your ice cream icy.
- Remove the tea bags and cool steeped tea.
- Blend the steeped tea with the blueberries.
- In a large bowl, whip heavy cream on low speed for about 2 minutes with chilled beater attachments, being careful not to over-whip the mixture.
- When firm peaks begin to form, add in the blueberry mixture, chilled sweetened condensed milk, and vanilla extract.
- Beat again for about 30 seconds on low speed to incorporate.
- Carefully pour mixture into a freezer safe loaf pan.
- Add in any extra fresh blueberries and crushed-up graham cracker. Carefully swirl into mixture or leave on top.
- Cover mixture with plastic wrap to prevent ice crystals from forming.
- Cover and freeze for at least 6 hours.
- Scoop and enjoy!
Did you make this recipe?
Make sure to mention @redroseteaus!